Jumat, 07 Januari 2022

Set up the cPanel plugin

Set up the cPanel plugin

Follow the instructions below to set up the cPanel Integration plugin. The installed plugin will activate an icon within the cPanel interface so that customers can go directly to their backups via the Server Backup Manager Web Interface for Hosting Control Panel users.

Note
With the latest release, new cPanel plugins are available. To know more about version support for plugins, Please   click here

Set up the cPanel Plugin using the Paper Lantern Theme

Note
Installing this plugin in a non-Paper Lantern theme or cPanel version earlier than 11.44 will result in unexpected behavior and may not work correctly. 
If you are using a non-Paper Lantern theme, please   click here  .

1. From the Main menu, under  Settings  , select  the Policy option   . Server Backup Manager will list all available policies.

2.Find the required Policies that have added Control Panel Instances. Click the ">" icon visible on the left side of the Policy, to view the policy details.


3. Click the "Control Panel" tab in the "Policy Details" window.

4. Click the "Download Plugin" icon, which is located in the right column. 

NOTE:   To download the Paper Lantern plugin directly, access the following address:   https://<SBM IP>/cpplugins/<r1soft-cpanel-plugin-version>.tar.gz 
Please remember to replace   <SBM IP> with the SBM IP Address actual and   <r1soft-cpanel-plugin-version> with the version supported by your SBM. 

5. Upload the file to the server.

6. Extract the cPanel plugin archive using the following command:

For example, If you have downloaded the plugin version 2.0 then you would use:

tar -xzf r1soft-cpanel-plugin-2.0.tar.gz


NOTE: Inside the extracted archive, there is a "README" file. This file also has instructions on how to set up the cPanel plugin.

7. Open    the r1redirect.php file   located at   <r1soft-cpanel-plugin-version>  /r1redirect.php   in a text editor.

For example, If you have downloaded the plugin version 3.0, then you would use:

vi r1soft-cpanel-plugin-3.0/r1redirect.php

8. Look for the line that contains the following text:

$SBM_URL = ""

Replace <URL> with your CDP server URL, such as "  http://127.0.0.1  " .    

9. Look for the line that contains the following text:

$CONTROL_PANEL_ID = ""

Replace <ID> with your control panel instance ID, such as   c1568882-3597-4931-84bb-d591eceb63f8  .   10. Copy    the r1redirect.php file   located at   <r1soft-cpanel-plugin-version>  /r1redirect.php   to your Paper Lantern cPanel Themes folder. For example, If you have downloaded the plugin version 3.0, then you would use:
 

cp r1soft-cpanel-plugin-3.0/r1redirect.php /usr/local/cpanel/base/frontend/paper_lantern/

11. Install the cPanel plugin into the Paper Lantern theme.

For example, If you have downloaded the plugin version 3.0, then you would use:

/usr/local/cpanel/scripts/install_plugin r1soft-cpanel-plugin-3.0 --theme paper_lantern

The   R1Soft Restore Backup   Link should now appear in cPanel using the Paper Lantern theme.

Setting up cPanel 1.x . Plugin

Note
Follow the instructions below to install the cPanel plugin if you are using a non-Paper Lantern theme or a cPanel version earlier than 11.44

1. To download the cPanel plugin from the SBM web interface, follow steps 1 to 5 in the previous procedure.

6. Extract the file using the following command:

tar -vzxf r1soft-cpanel-plugin-1.1.tar.gz

7. In the archive there is a "README" file with instructions on how to set it up.

8. Open    the r1redirect.php file   in your favorite Linux text editor (vi, emacs, pico, or mcedit).

9. Find the line containing the following string:

$CDP_SERVER_URL = "..."

Replace the URL with your Backup Manager URL (for example,   http://10.230.200.38  ).   

10. Look for the line that contains the following text:

$CONTROL_PANEL_ID = "..."

Replace the ID with your Control Panel Instance ID (for example, 8e367b22-0ce5-481c-98ad-2667d50cf48c).  

The Control Panel Instance ID tip is
located in the "Control panel Instance Id" column.  

11. Copy    the r1redirect.php file   to your cPanel theme folder. As an example:

cp r1redirect.php /usr/local/cpanel/base/frontend/default/

12. Run the following command to integrate the plugin with cPanel:

/usr/local/cpanel/bin/register_cpanelplugin r1soft-cdp.cpanelplugin

13. The Backup Manager link will now appear within the cPanel.

Plugin support version

1. If you are using a non-Paper Lantern theme or a cPanel version earlier than 11.44, make sure you are using a cPanel plugin version lower than r1soft-cpanel-plugin-2.0

2. If you are using Paper Lantern (version 11.44 or higher), please check your SBM release version. 

  • For SBM 6.12 and below, make sure the version used is version 2.0
  • For SBM 6.14 and above, make sure the version used is version 3.0
  • For SBM 6.16 and above, make sure the version used is version 4.0
How to install Softaculous on cPanel/WHM

How to install Softaculous on cPanel/WHM

 Guide on how to install Softaculous on cPanel/WHM. Softaculous is a plugin for installing PHP, Perl and JavaScript software or applications. Popular web applications available on Softaculous include: WordPress, Prestashop, Joomla, Drupal and others.

So by installing the Softaculous plugin, every cPanel account is able to have an installer script feature, so users can easily install applications for the web via cPanel, install WordPress for example  (instantly, just click) .


Oh yes Softaculous is NOT free, there is a paid license starting from $12/year for VPS if I 'm not mistaken,  check here .

Here's a tutorial on how to install Softaculous

Activate ionCube Loader

  • Login to WHM with root account
  • Select  Server Configuration  > click  Tweak Settings
  • On the PHP tab   >  cPanel PHP loader  = check  ionCube

Install Softaculous via SSH

  • SSH access with root account
  • Run this command: wget -N http://files.softaculous.com/install.sh
  • Then CHMOD to make it executable: chmod 755 install.sh
  • Next, execute the installer script, the command: ./install.sh

The process is something like this

-----------------------------------------------------
Welcome to Softaculous Apps Installer
-----------------------------------------------------
//////////////////////////////
// INSTALLING SOFTACULOUS
// Detected Panel : cPanel
// DOWNLOADING SOFTACULOUS PACKAGE
// CONFIGURED universal.php
// FETCHED THE LICENSE
// UPDATED SCRIPTS CATEGORIES
// UPDATED SCRIPTS LIST
// ADDED CRON JOB
// REGISTERING SOFTACULOUS PLUGIN WITH CPANEL
// This might take a few minutes...
// BUILDING SCRIPT CACHE
// REGISTERING SOFTACULOUS SCRIPTS CATEGORY WITH CPANEL
// This might take a few minutes...
// Script Packages will be downloaded in background
//////////////////////////////
================================================== ===
Congratulations, Softaculous was installed successfully
Softaculous has been installed at:
Path : /usr/local/cpanel/whostmgr/docroot/cgi/softaculous
Scripts Path : /var/softaculous

Installation is complete, now open WHM, make sure at the bottom left in the Plugins column   there is a Softaculous – Instant Install menu 

Oh yes, for those who fail, I will gladly install it for you, but there is a cost that is clearly very cheap. ️ don't doubt it. WA me at 081377395879.  Setup cPanel/WHM+Softaculous .

Easy Way to Install Cloudpanel on Debian 10, It Only Takes 60 Seconds!

Easy Way to Install Cloudpanel on Debian 10, It Only Takes 60 Seconds!

 CloudPanel is a FREE and modern server control panel with lightweight components such as NGINX, PHP-FPM and MySQL that have been developed to work optimally, safely, and of course easy to use.

About Cloudpanel

Cloudpanel was founded by Stefan Wieczorek as Founder & CTO and Raphael Thiel as Co-Founder & CEO. CloudPanel is also the community edition of the MGT-COMMERCE control panel which was founded in 2011 in Berlin to provide highly specialized cloud hosting services combined with unique software solutions for Magento e-commerce software. 

MGT-COMMERCE GmbH is known for its high-performance technology stack with its innovative and easy-to-use software solutions. With enterprise services and solutions, customers can fully concentrate on their business; Web agents and developers can focus on development.

Advantages of Cloudpanel

Quoting from the Cloudpanel.io blog, the following are some of the advantages offered when you will use this control panel.

1. CloudPanel is free – forever!

CloudPanel is completely free. Not just now, but forever. This means in detail:

  • No contract
  • No hidden fees or charges
  • There is no limit or limitation

2. CloudPanel is easy to use, modern and time-saving!

With CloudPanel you can add in no time:

  • Domain
  • Database
  • User
  • and many more

Plus, you won't lose any setup time because: Cloud Panel is up and running in just 60 seconds!

3. CloudPanel brings advanced Cloud Functionality.

Cloudpanel supports the world's major cloud services such as for example; AWS, DigitalOcean, Google Cloud, and Microsoft Azure. That's why CloudPanel makes it easy to find everything you want very quickly.

4. CloudPanel delivers maximum performance and security.

Cloudpanel itself uses Stack from Debian, pure NGINX, MySQL as database, Redis which is installed by default. Quick access to server access logs and error logs. Also easy to do advanced admin stuff like SSH, remote DB.

5. CloudPanel supports multiple PHP versions, languages, and more.

In addition to automatic login to phpMyAdmin, CloudPanel itself supports several PHP versions such as PHP 7.1 , PHP 7.2, PHP 7.3, PHP 7.4 and the latest PHP 8.0.

Cloudpanel Install Requirements

To use CloudPanel, before installing you need the following system requirements:

  • Debian 10 (Buster) Operating System
  • CPU 1 Core
  • RAM 2GB
  • Disk 15GB

How to Install Cloudpanel

To install CloudPanel, we must first login with SSH, then run a system update first.

apt update
apt upgrade -y

Before we run the installer, we need to update the sources and install the required packages.

apt -y install curl wget sudo

To start the CloudPanel installation, run the following command:

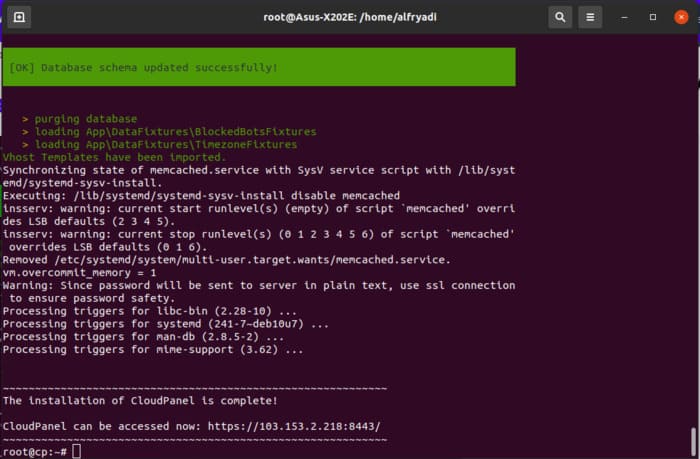
curl -sSL https://installer.cloudpanel.io/ce/v1/install.sh | sudo bash
Install Cloudpanel

Accessing CloudPanel

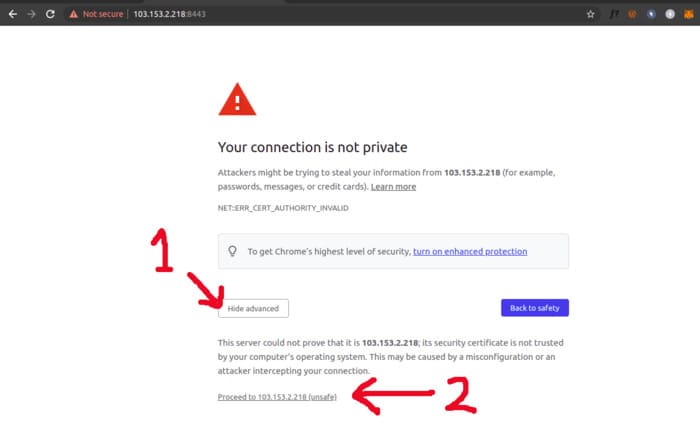
You can now access CloudPanel via Browser: https://103.153.2.218:8443/

Install Cloudpanel2

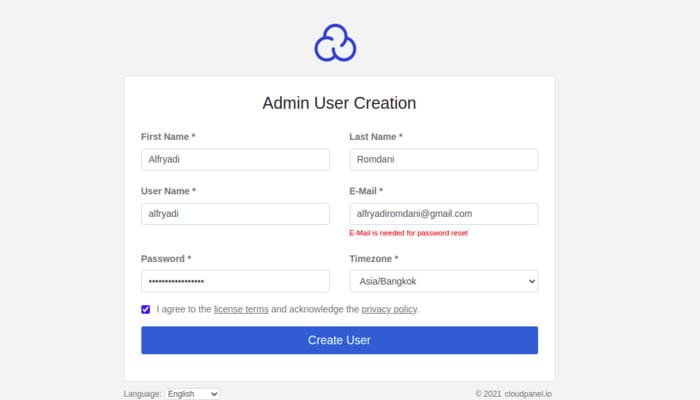
Ignore the self-signed certificate warning and click Advanced and Continue to proceed to CloudPanel. The next step is to create an Admin user login as shown in the image below.

Install Cloudpanel3

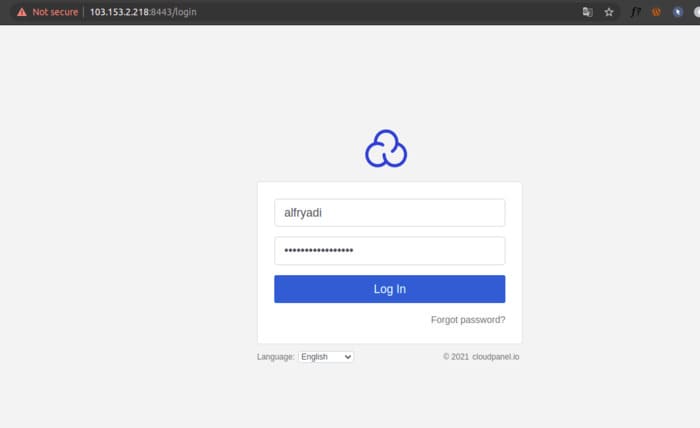
After that you will enter the next screen before logging in, which is to fill in your username and password.

Install Cloudpanel4

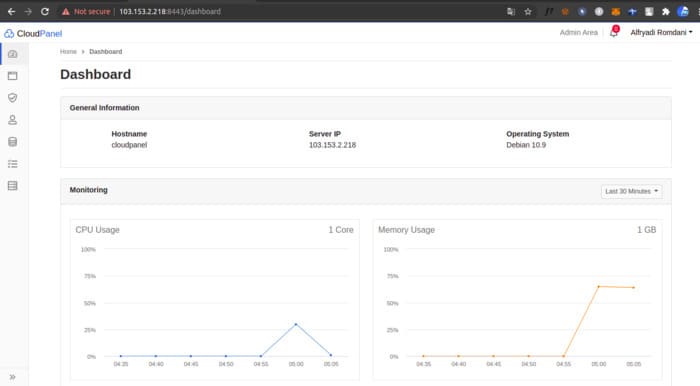
After successfully filling in the password and login. Congratulations, you have successfully installed Cloudpanel and successfully entered the dashboard as shown below.

Install Cloudpanel5